Prevent Icicles & Ice Dams on Your Building
Winter can be tough on commercial and industrial buildings, with snow and ice accumulating on roofs and gutters. King ’s advanced electric de-icing systems efficiently melt ice, ensuring your building is protected from snow damage, while preserving the visual appeal of your building.
Dependable, Field- Proven Durability
Most roofs can only support 20 lbs of snow per square foot before the risk of collapse arises. Self-regulating roof de-icing systems provide a reliable solution by maintaining a clear path for melting water to drain safely. King’s self-regulating roof heating cables are versatile for various climates and are built to withstand extreme weather conditions, including high winds, low temperatures, and heavy snow loads.
How Much Cable Do I Need?
If snow and ice accumulates on your roof, self-regulating heating cables are an easy and effective to solution to melt the ice dams before they cause major damage.
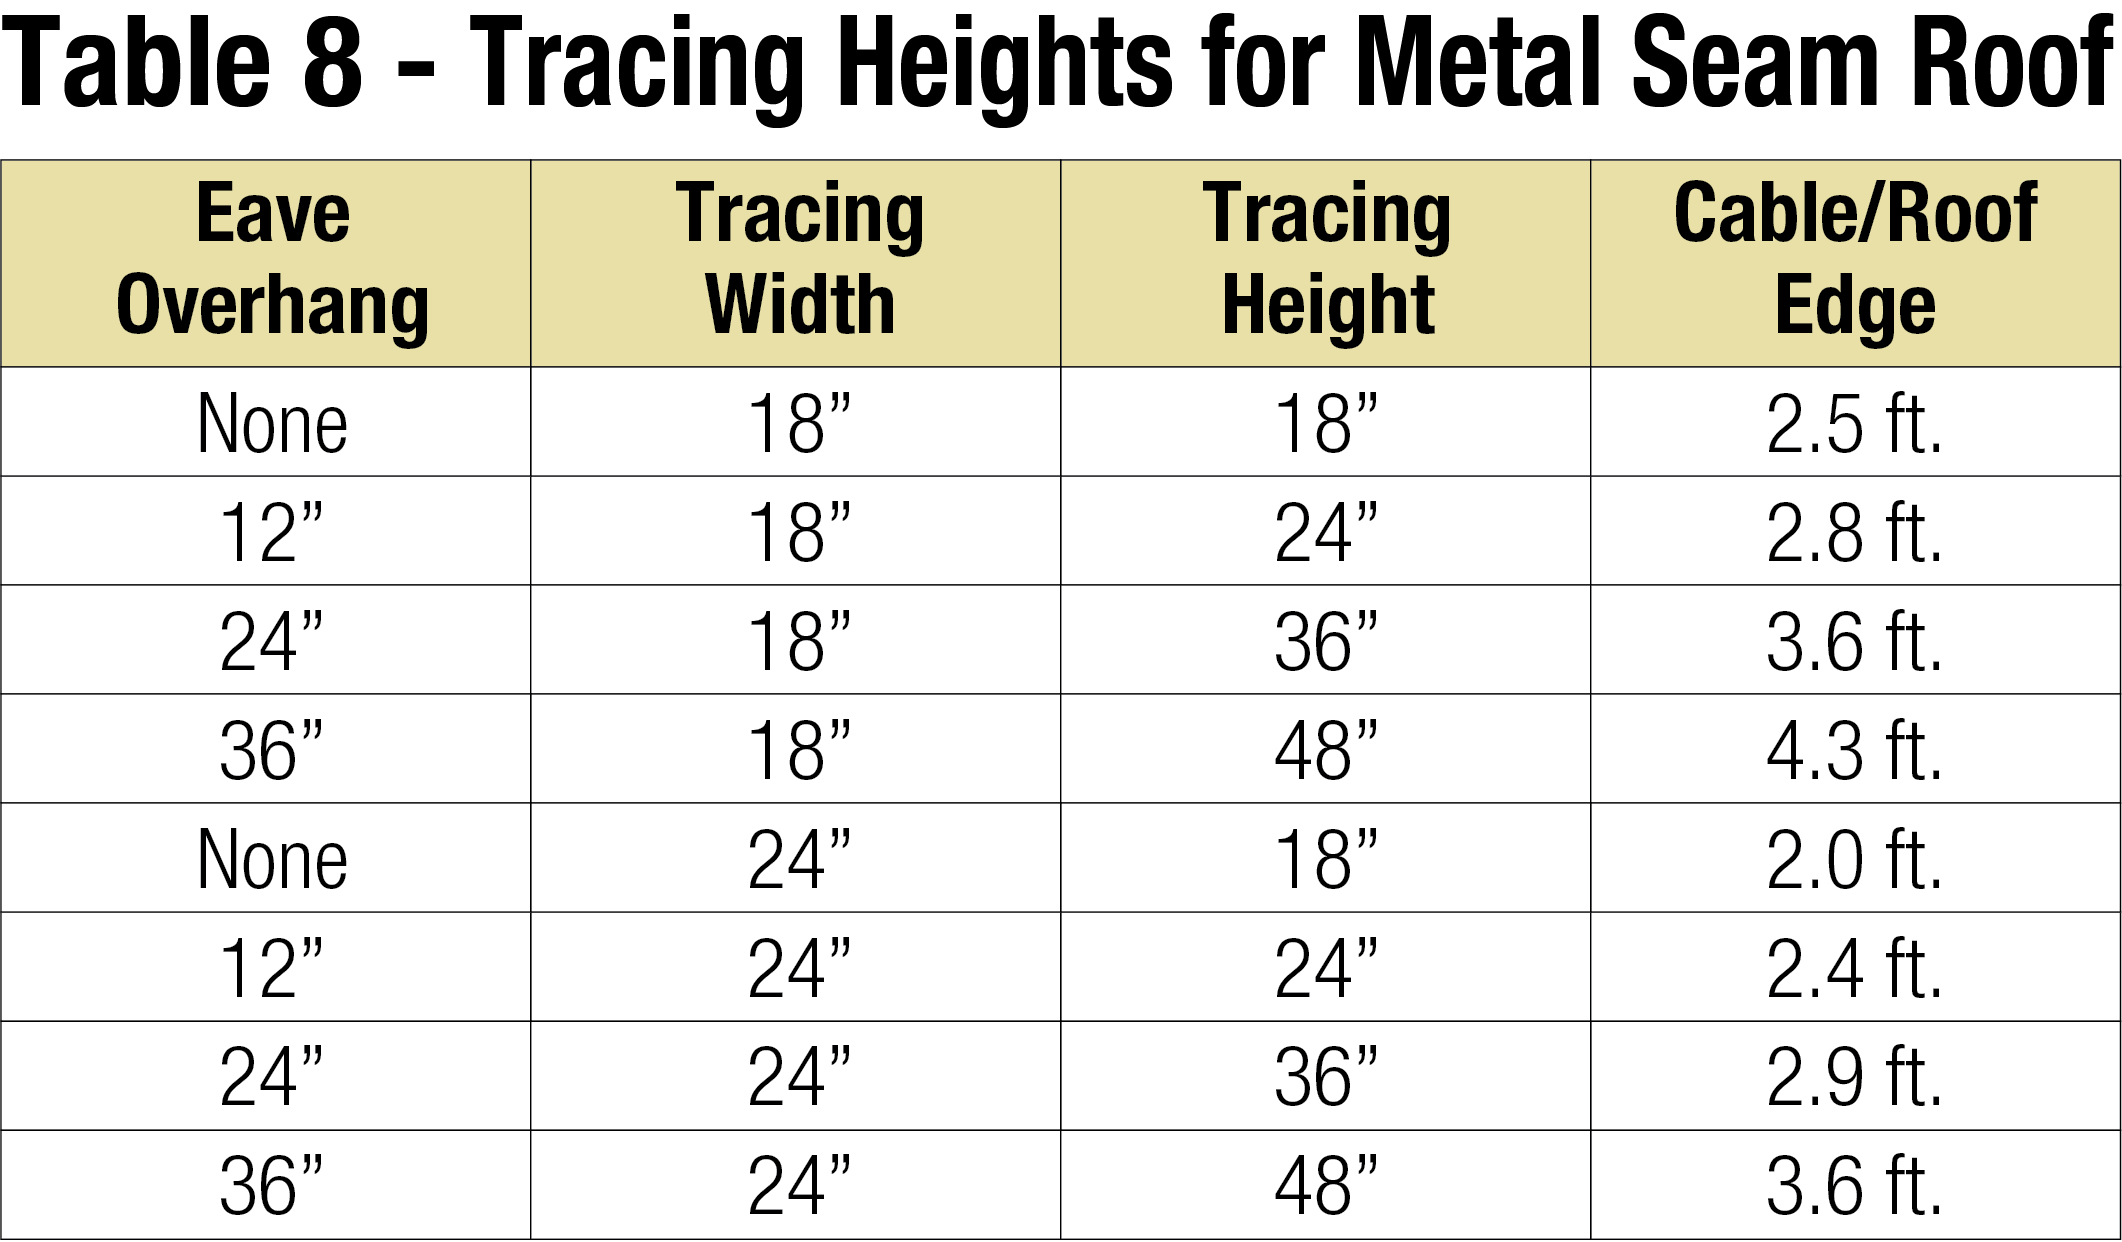
Use the below formula to estimate the length of heat cables for your home, based on your roof length and overhang width.
Calculation For Heating Cable Length
Total heating cable length = A+B+C+D+E+F+G
A (Roof edge) x (heating cable multiplier)
B (Roof edge x 0.5)
C (Total gutter length)
D (Total downspout length + 1 ft.)
E (1 ft. for each power connection)
F (2 ft. for each splice)
G (3 ft. for each tee connection)
=Total heating cable length required.
Example:
1. Roof edge = 48 ft.
2. Eave overhang = 1 ft. (Refer to cable table 6)
3. Gutter = 48 ft.
4. Downspout = 22 ft.
5. Power connection = 2 each
6. Splice = 3 each
Heating Cable Required:
A Roof edge: 48 ft. x 2.8 (From table 6) = 134.4 ft.
B Roof extension*: 48 ft. x 0.5 = 24.0 ft.
C Roof gutter: 48 ft. = 48.0 ft.
D Downspout: 22 ft. + 1 ft. = 23.0 ft.
E Power Connection: 2 x 1 ft. = 2.0 ft.
F Splice Connection: 3 x 2 ft. = 6.0 ft.
G Tee Connection: 0 x 3 ft. = 0 ft.
Total heating cable length required: = 237.4 ft.
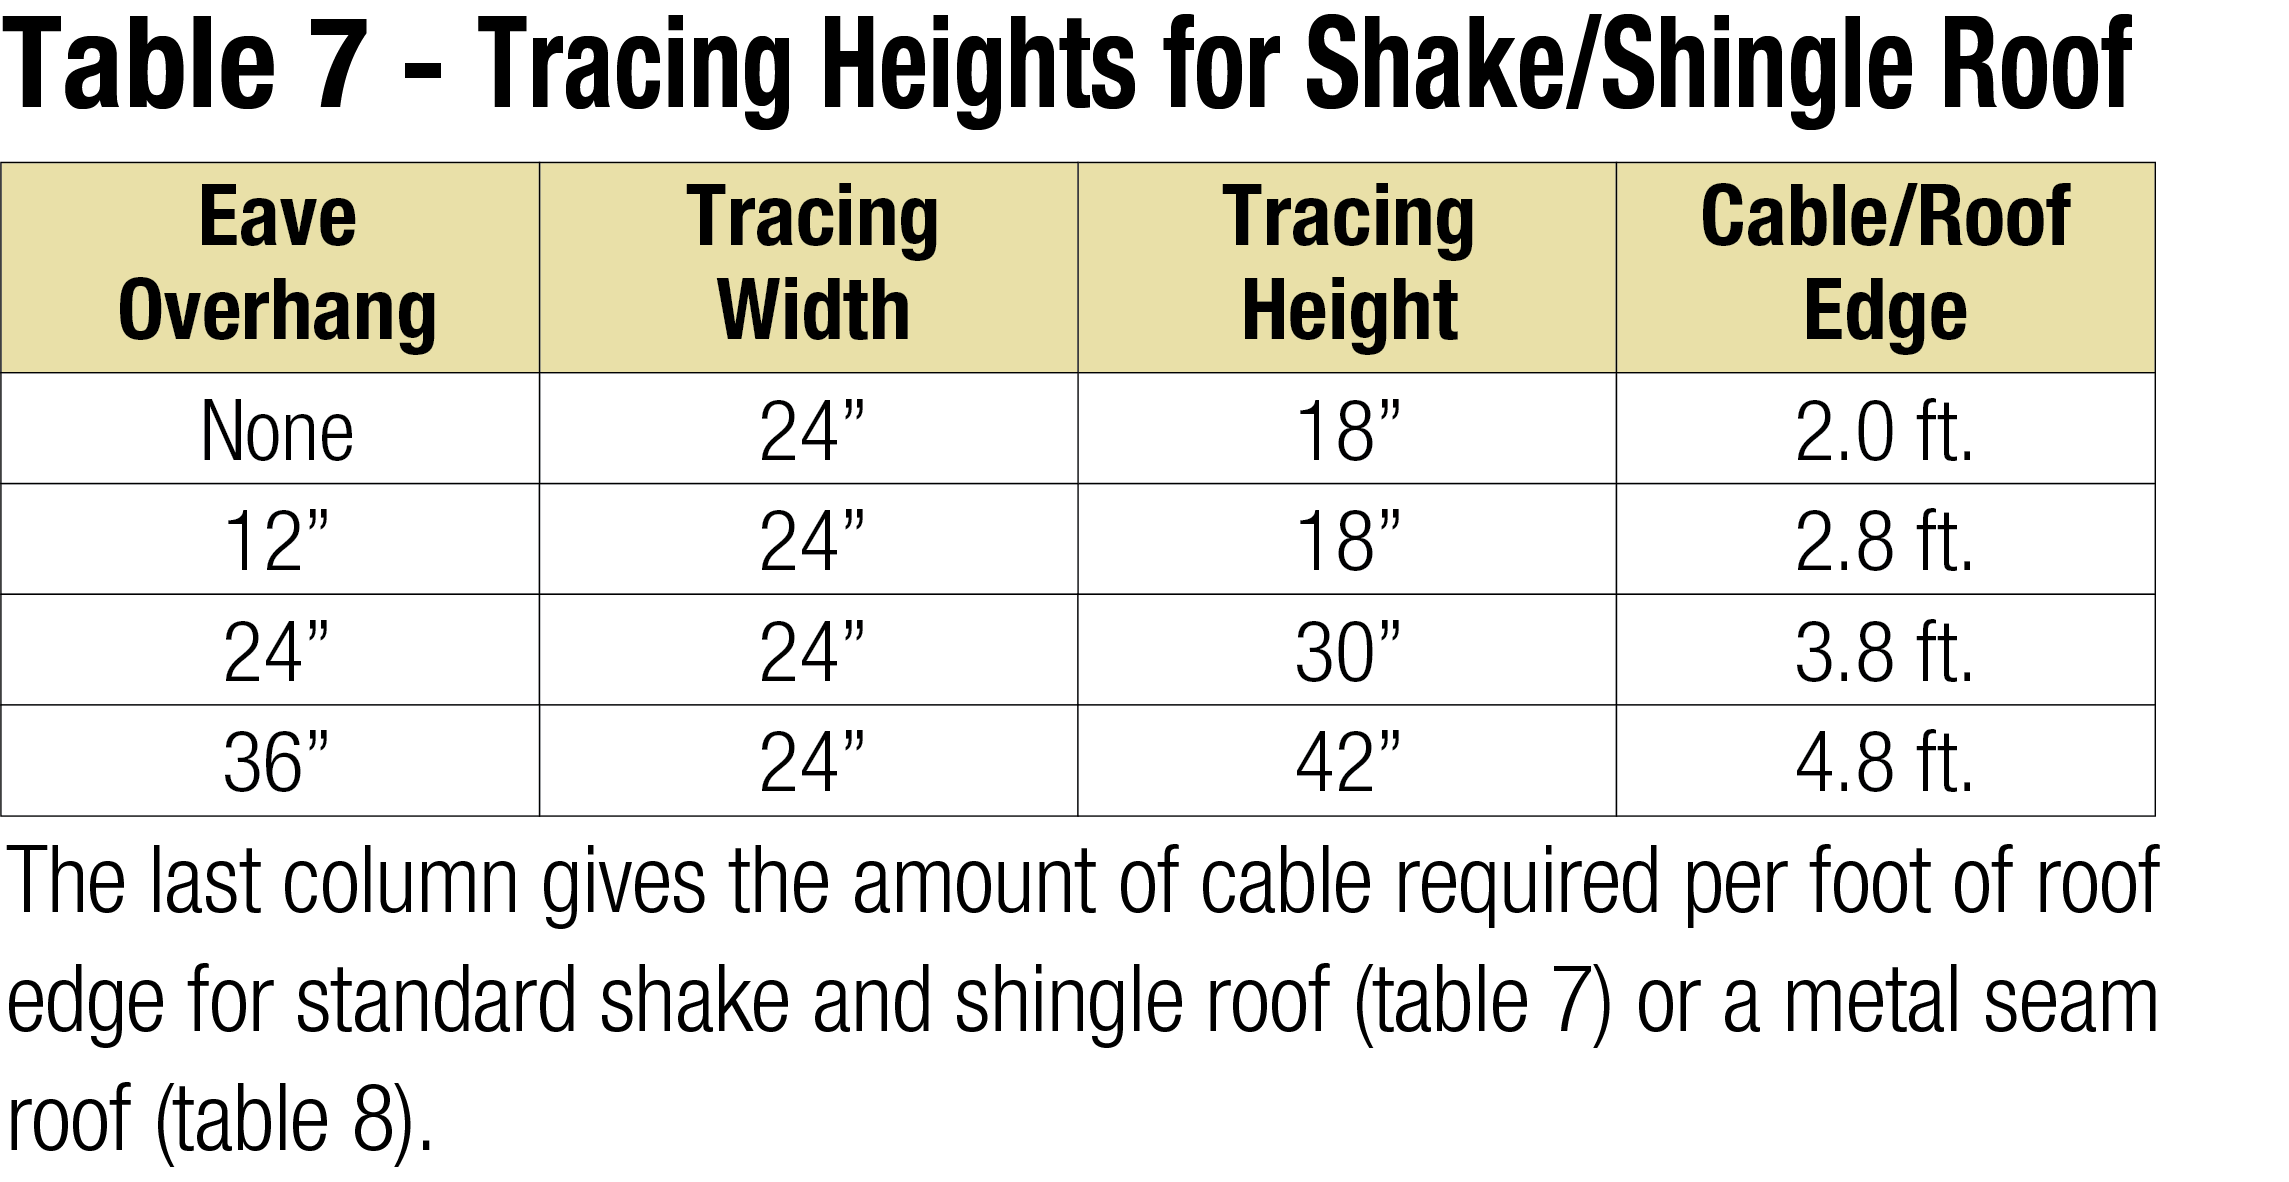
*Roof extension is the length of cable required to prevent ice dams between the roof edge and the gutter. When there are no gutters present it forms a drip loop to prevent s at the roof edge.
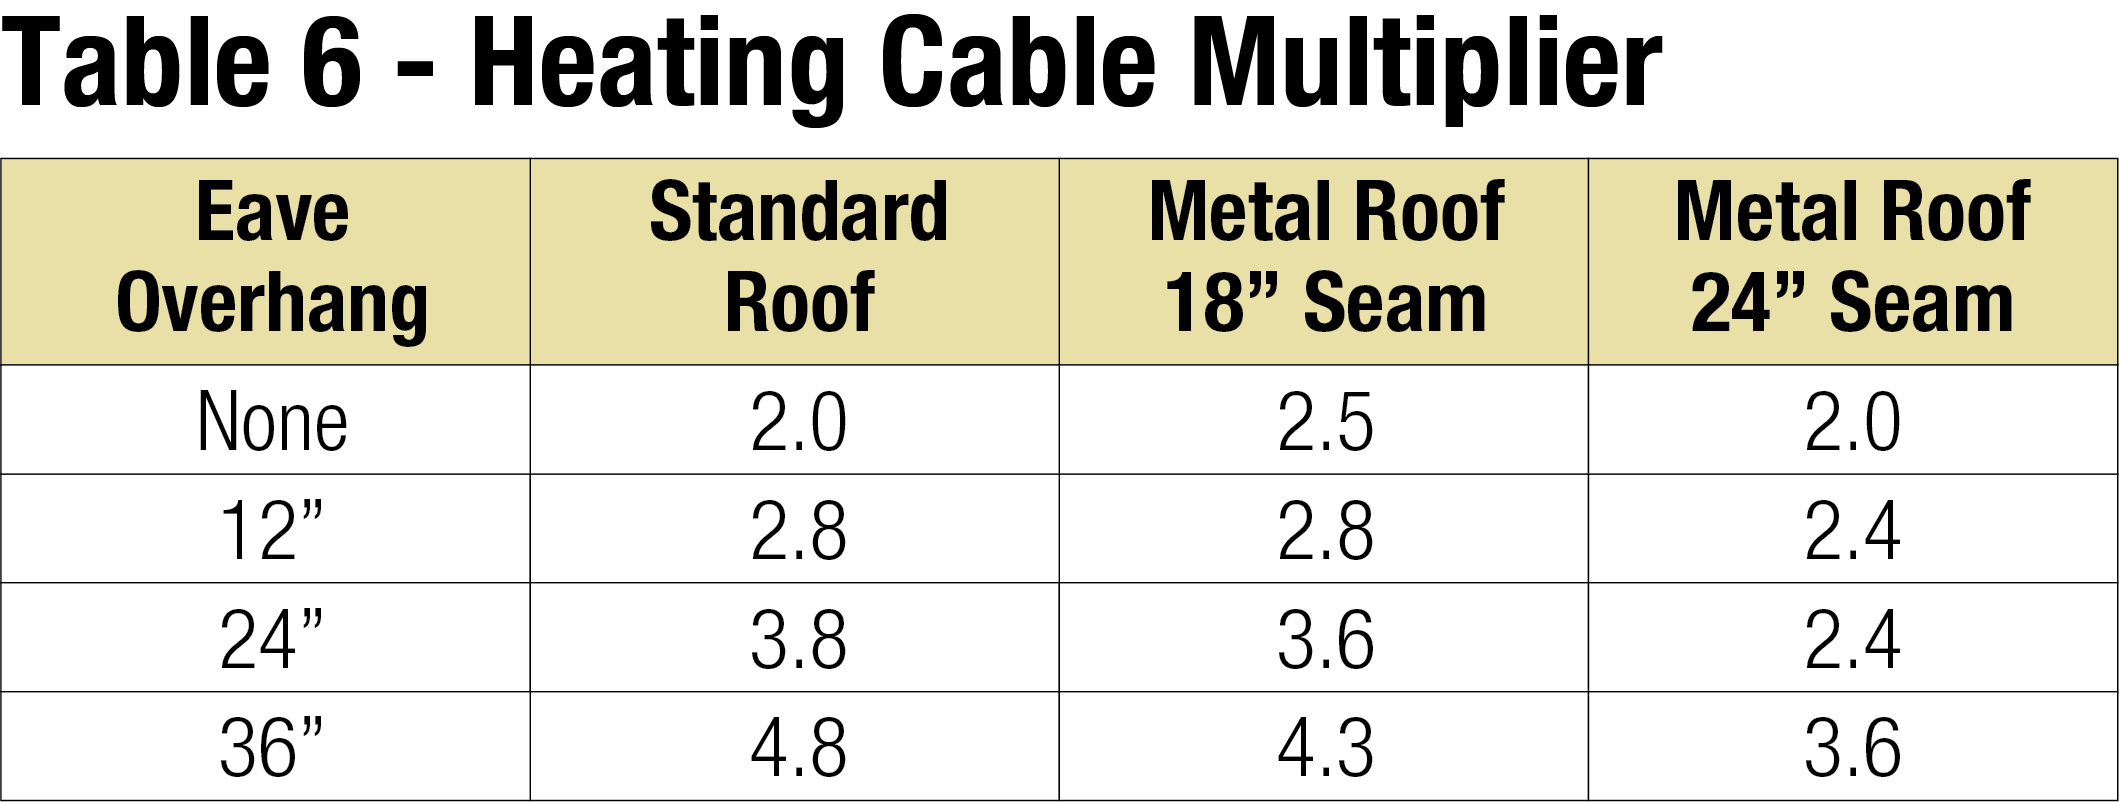
Use the number in the table and multiply it by the length of the roof
Calculations for Gutters, Downspout and Valley
1. For standard non-metal roofs, add 1 foot of heating cable for each foot of gutter.
2. Add 1 foot of heating cable per foot of downspout.
3. If the downspout is in the middle of the run, loop the cable down and back up. Double the length of the downspout for determining the length of the cable to install.
4. For valleys, run the heating cable two thirds of the way up and down the valley. Add this additional length to the overall cable.
5. For gutters 6 inches wide use two cable runs.
Design Notes
1. In-line splices and tee splices should be avoided where possible.
2. Heating cable in downspouts should be looped and extend below the frost line if tied into a drainage system.
3. End terminations should not be located in an area where moisture is present. End terminations should not be located at the lowest point of downspouts.
4. For roof drains leading into a heated area, a loop of heating cable should be installed to a depth of 3 ft.
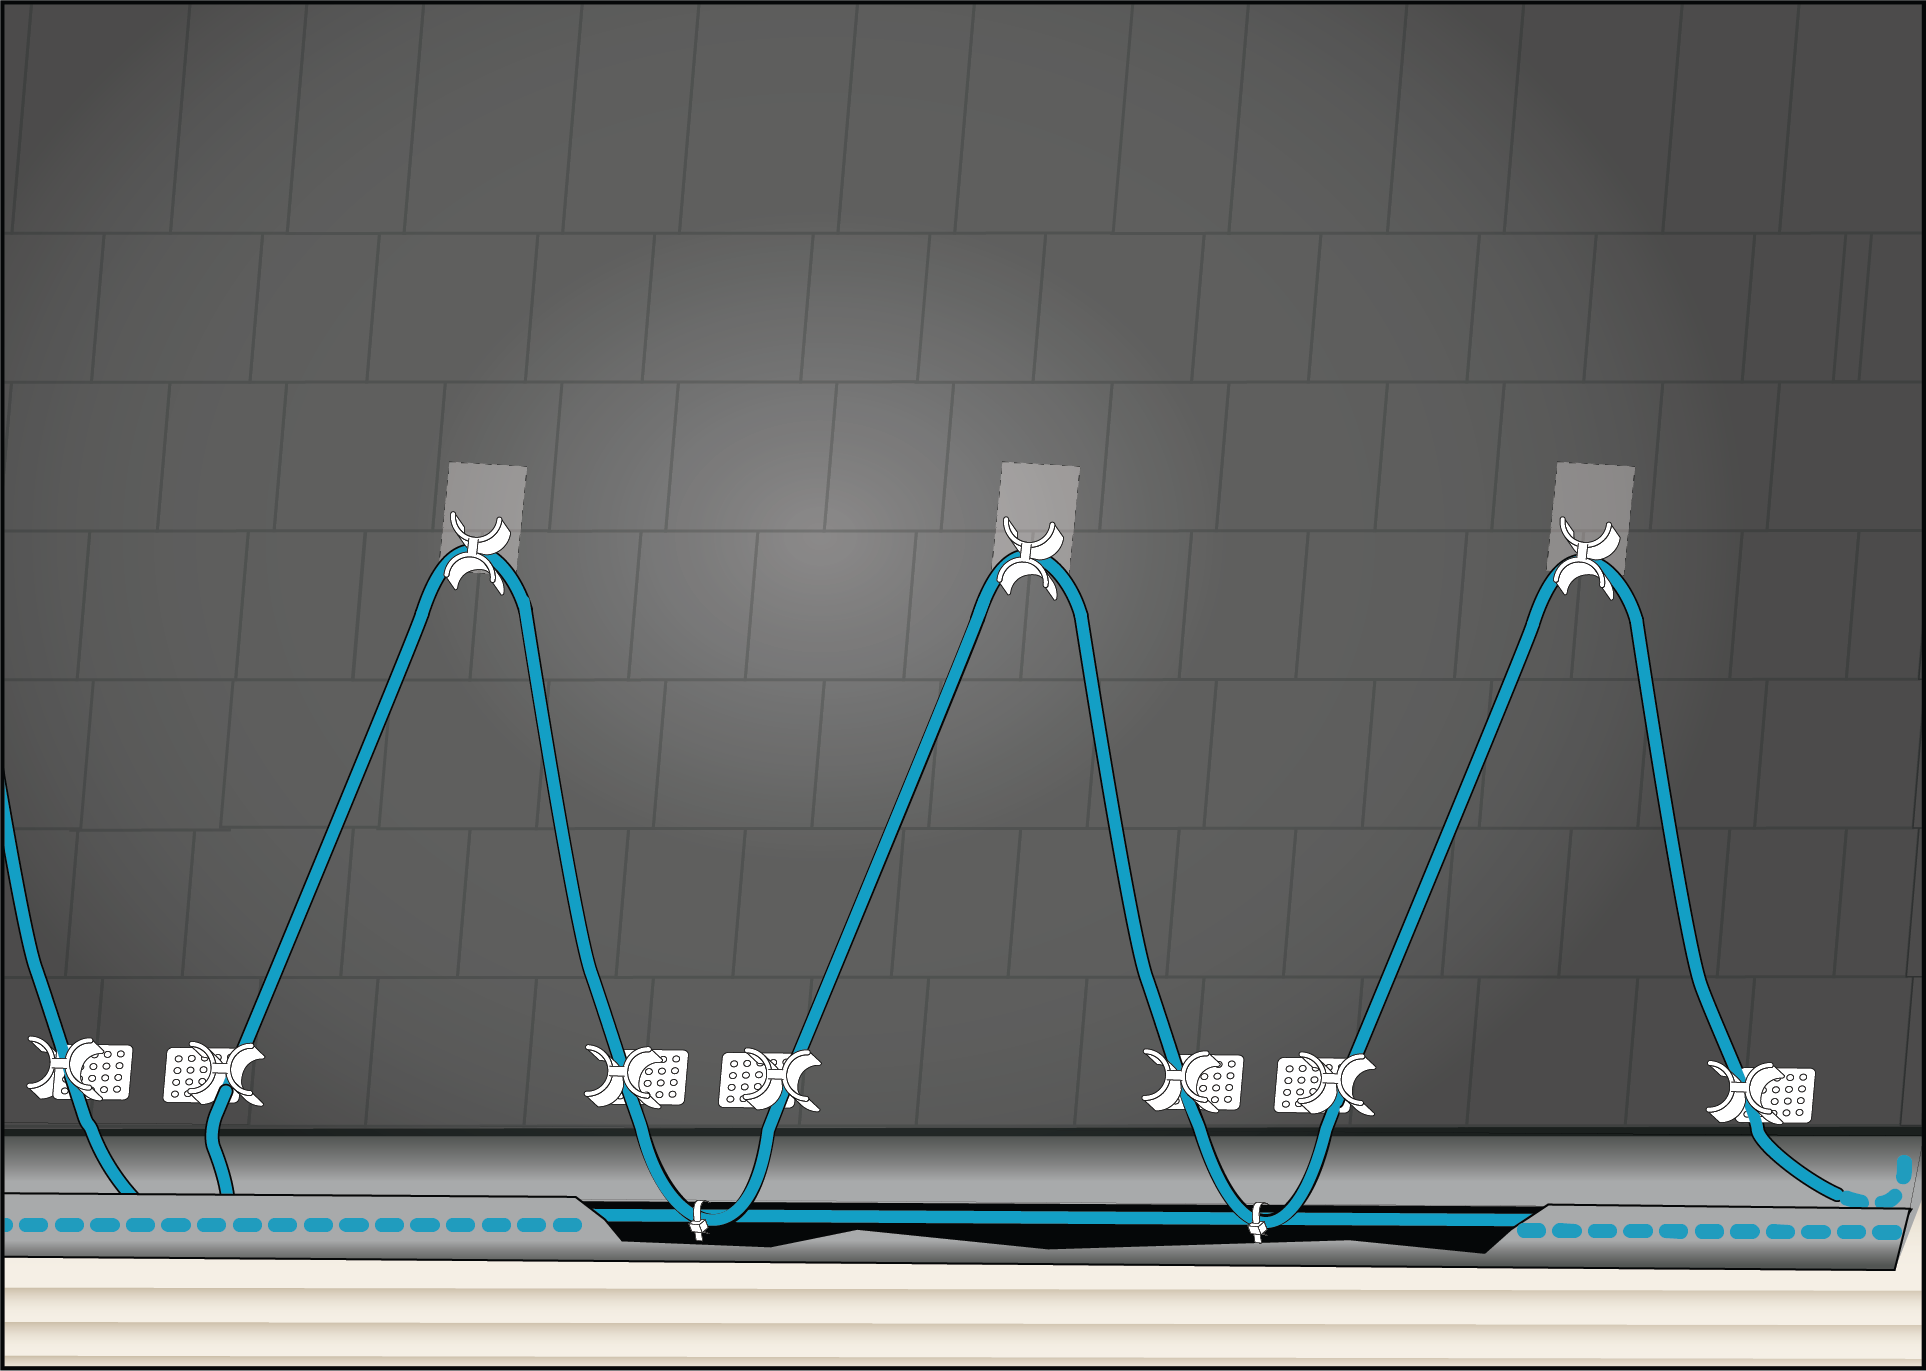
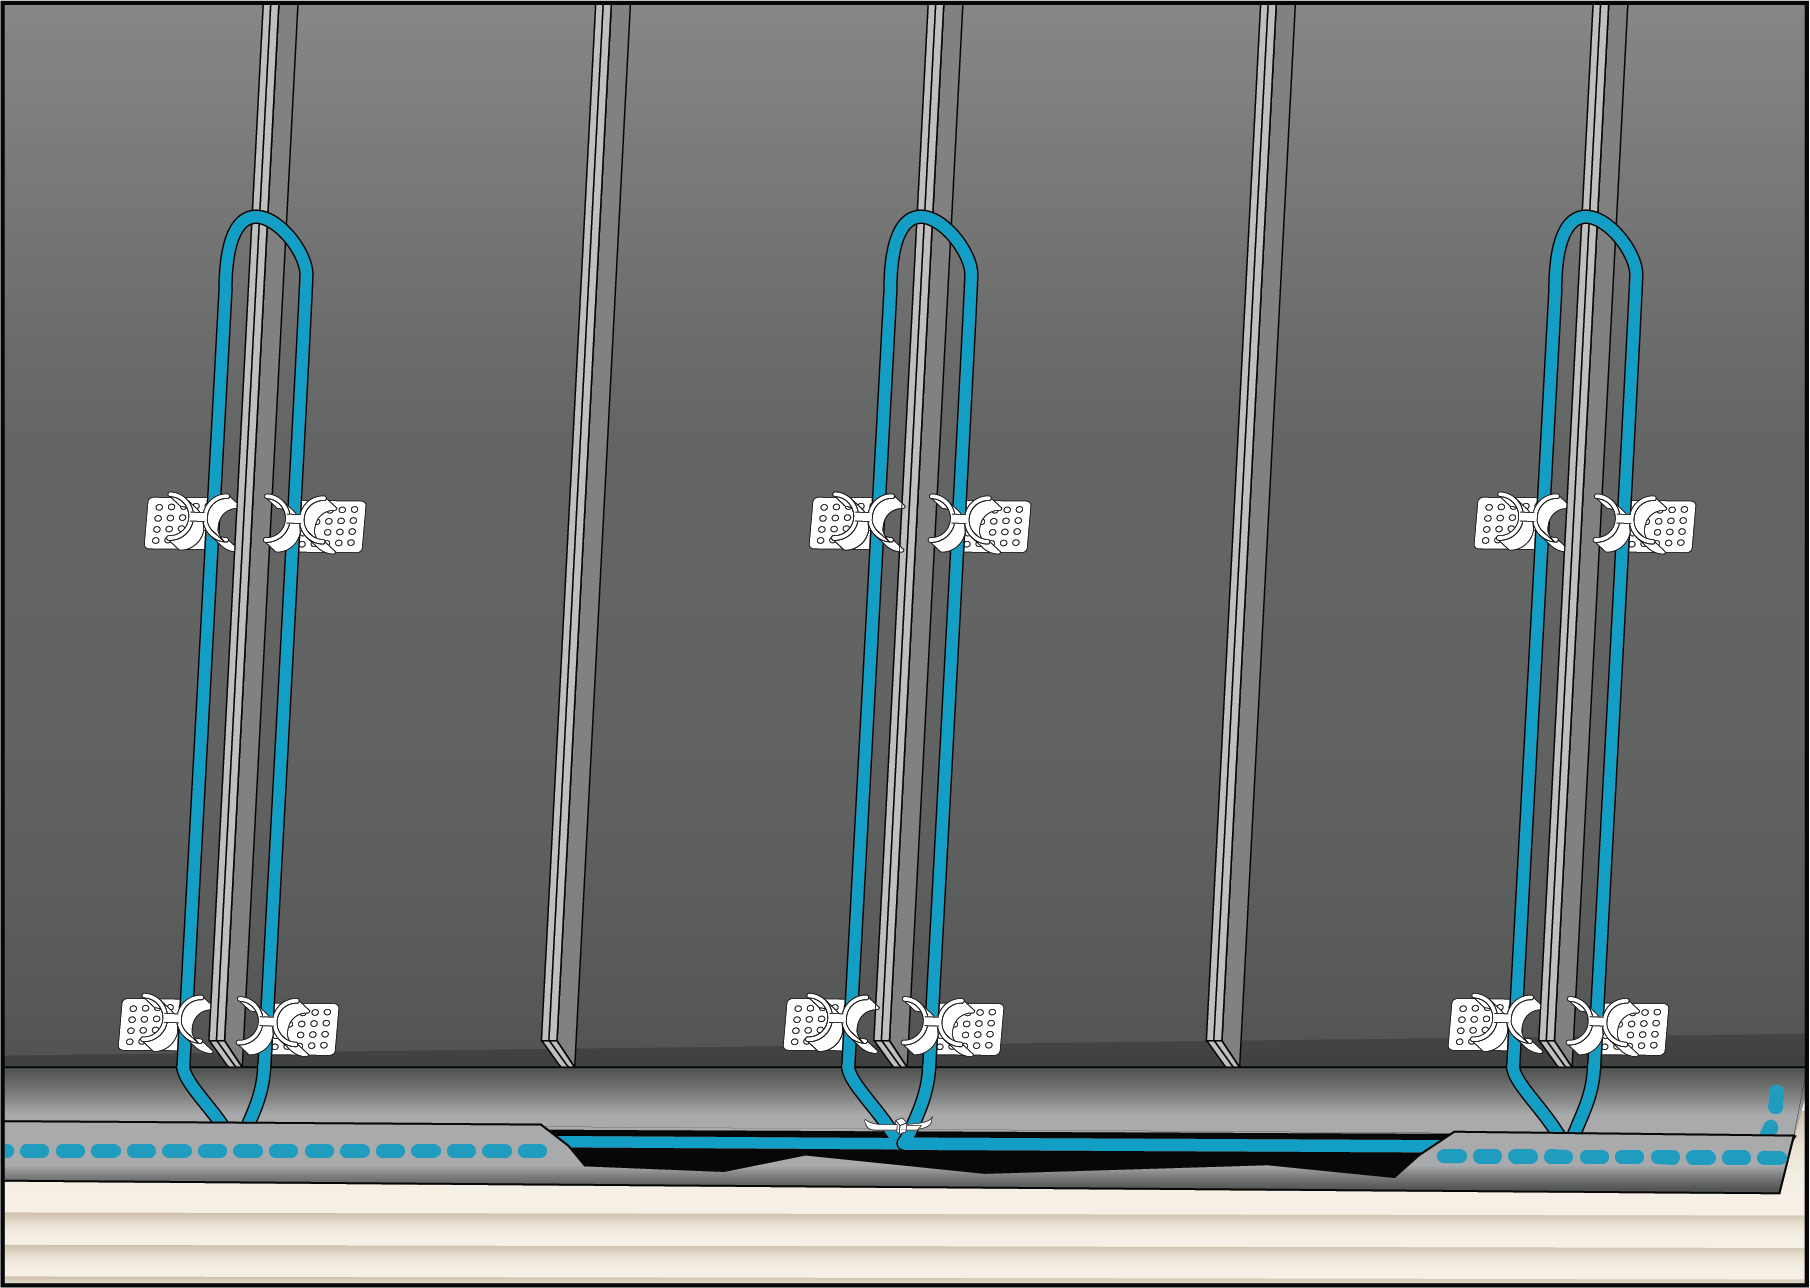
General Information
1. SR cable is designed to remove ice, not accumulated snow.
2. SR cable will not keep snow or ice from falling off of the roof. Snow fences or snow guards should be used to eliminate snow movement.
3. SR heating cables may be used on:
– Roofs made from all types of roofing materials, such as shake, shingle, rubber, tar, wood, metal, and plastic.
– Gutters made from standard materials, such as metal and plastic.
– Downspouts made from standard materials, such as metal and plastic.
4. Do not install the heating cable underneath any roof covering.
5. Install only in accessible locations; do not install behind walls or where the cable would be hidden.
6. Do not run the heating cable through walls, ceilings, or floors.
7. Connect only to ground-fault protected circuit breakers or outlets that have been installed in accordance with all national and local codes and standards and that are protected from rain and other water sources such as melting ice water.
8. Do not exceed the amp rating of the over current protection device.